WebService com EJB Hello Wolrd
Warning: WP_Syntax::substituteToken(): Argument #1 ($match) must be passed by reference, value given in /home/feltexco/public_html/felix/wp-content/plugins/wp-syntax/wp-syntax.php on line 380
Warning: WP_Syntax::substituteToken(): Argument #1 ($match) must be passed by reference, value given in /home/feltexco/public_html/felix/wp-content/plugins/wp-syntax/wp-syntax.php on line 380
Warning: WP_Syntax::substituteToken(): Argument #1 ($match) must be passed by reference, value given in /home/feltexco/public_html/felix/wp-content/plugins/wp-syntax/wp-syntax.php on line 380
WebService com EJB Hello Wolrd
Olá amigos,
Web Service é um serviço web que fica disponível via HTTP independente de linguagem. Hoje iremos criar um WebService com EJB. Será Hello Wolrd com EJB. Veremos que é muito simples. Mãos à obra.
Ambiente a ser configurado:
- Servidor WildFly
- Eclipse
- EJB
- JDK 7
Tarefas:
Criando o projeto web
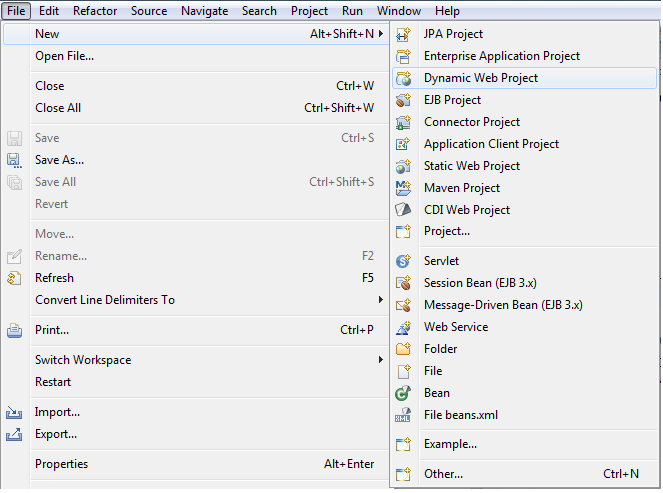
Este projeto conterá o EJB que disponibilizará um Web Service. Abra o Eclipse e acesse File >> New >> Dynamic Web Project.
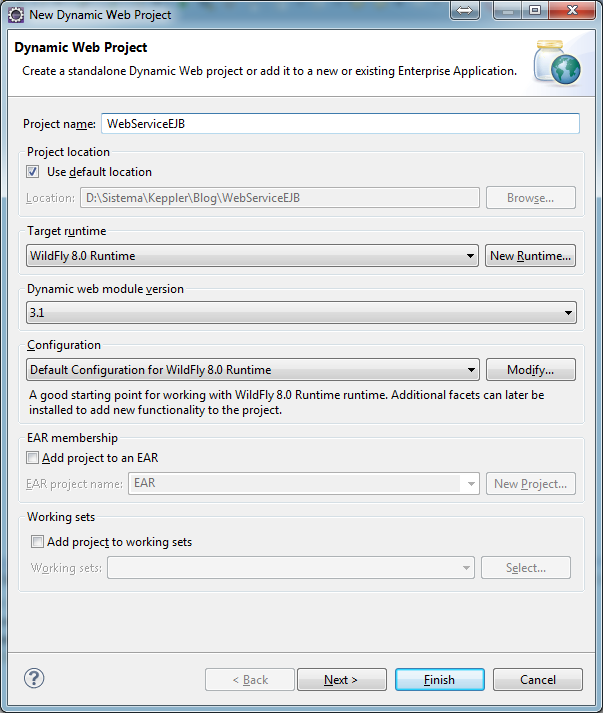
Digite o nome do projeto “WebServiceEJB” e em seguida finish.
Criando EJB que disponibilizará o serviço
Selecione o projeto que acabamos de criar. Pressione Ctrl + N. Na tela que aparecerá digite “Session Bean” e selecione a opção “EJB” >> Session Bean (EJB 3.x).
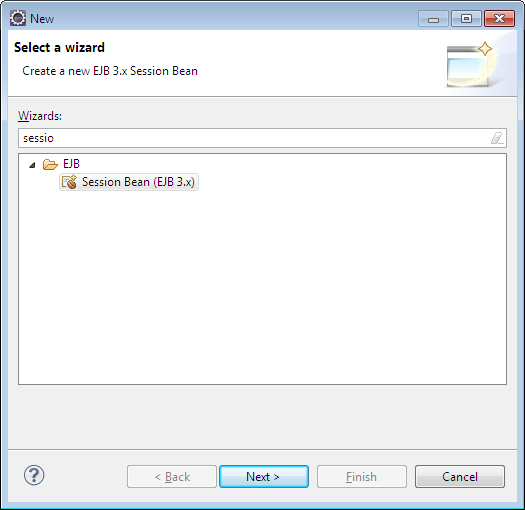
Selecione next.
E preencha os campos conforme imagem abaixo:

Por fim. Selecione “Finish”
Seu EJB “AloMundoWebService” será exibido. Adicione o seguinte código à sua classe:
1 2 3 4 5 6 7 8 9 10 11 12 13 14 15 16 17 18 19 | package br.com.feltex.webservice; import javax.ejb.Stateless; import javax.jws.WebMethod; import javax.jws.WebService; @Stateless @WebService public class AloMundoWebService { public AloMundoWebService() { } @WebMethod public String criarMensagem(String nome) { return "Ola " + nome + " seja bem vinda!" + System.currentTimeMillis(); } } |
Vamos comentar as anotacções:
@Stateless – Define que sua classe é um EJB.
@WebService – Define que seu EJB está disponível também como um Web Service.
@WebMethod – Define quais métodos ficarão disponível no seu Web Service.
Pronto. A parte do servidor já foi criada. Agora temos um Web Service.
Inicie sua aplicação no servidor e procure no log uma saída assim:
 address=http://localhost:8080/WebServiceEJB/AloMundoWebService
 implementor=br.com.feltex.webservice.AloMundoWebService
 serviceName={http://webservice.feltex.com.br/}AloMundoWebServiceService
 portName={http://webservice.feltex.com.br/}AloMundoWebServicePort
 annotationWsdlLocation=null
 wsdlLocationOverride=null
 mtomEnabled=false
Isto significa que nosso web Service foi publicado e está funcionando. Podemos testá-lo abrindo o browser e utilizando a URL:
http://localhost:8080/WebServiceEJB/AloMundoWebService?wsdl
Observe que adicionamos “?wsdl” ao final da url. Isto porque queremos ver as definições do Serviço. A saída é a seguinte:
1 2 3 4 5 6 7 8 9 10 11 12 13 14 15 16 17 18 19 20 21 22 23 24 25 26 27 28 29 30 31 32 33 34 35 36 37 38 39 40 41 42 43 44 45 46 47 48 49 50 51 52 53 54 55 56 | <?xml version="1.0" ?><wsdl:definitions xmlns:xsd="http://www.w3.org/2001/XMLSchema" xmlns:wsdl="http://schemas.xmlsoap.org/wsdl/" xmlns:tns="http://webservice.feltex.com.br/" xmlns:soap="http://schemas.xmlsoap.org/wsdl/soap/" xmlns:ns1="http://schemas.xmlsoap.org/soap/http" name="AloMundoWebServiceService" targetNamespace="http://webservice.feltex.com.br/"> <wsdl:types> <xs:schema xmlns:xs="http://www.w3.org/2001/XMLSchema" xmlns:tns="http://webservice.feltex.com.br/" elementFormDefault="unqualified" targetNamespace="http://webservice.feltex.com.br/" version="1.0"> <xs:element name="criarMensagem" type="tns:criarMensagem"></xs:element> <xs:element name="criarMensagemResponse" type="tns:criarMensagemResponse"></xs:element> <xs:complexType name="criarMensagem"> <xs:sequence> <xs:element minOccurs="0" name="arg0" type="xs:string"></xs:element> </xs:sequence> </xs:complexType> <xs:complexType name="criarMensagemResponse"> <xs:sequence> <xs:element minOccurs="0" name="return" type="xs:string"></xs:element> </xs:sequence> </xs:complexType> </xs:schema> </wsdl:types> <wsdl:message name="criarMensagem"> <wsdl:part element="tns:criarMensagem" name="parameters"> </wsdl:part> </wsdl:message> <wsdl:message name="criarMensagemResponse"> <wsdl:part element="tns:criarMensagemResponse" name="parameters"> </wsdl:part> </wsdl:message> <wsdl:portType name="AloMundoWebService"> <wsdl:operation name="criarMensagem"> <wsdl:input message="tns:criarMensagem" name="criarMensagem"> </wsdl:input> <wsdl:output message="tns:criarMensagemResponse" name="criarMensagemResponse"> </wsdl:output> </wsdl:operation> </wsdl:portType> <wsdl:binding name="AloMundoWebServiceServiceSoapBinding" type="tns:AloMundoWebService"> <soap:binding style="document" transport="http://schemas.xmlsoap.org/soap/http"></soap:binding> <wsdl:operation name="criarMensagem"> <soap:operation soapAction="" style="document"></soap:operation> <wsdl:input name="criarMensagem"> <soap:body use="literal"></soap:body> </wsdl:input> <wsdl:output name="criarMensagemResponse"> <soap:body use="literal"></soap:body> </wsdl:output> </wsdl:operation> </wsdl:binding> <wsdl:service name="AloMundoWebServiceService"> <wsdl:port binding="tns:AloMundoWebServiceServiceSoapBinding" name="AloMundoWebServicePort"> <soap:address location="http://localhost:8080/WebServiceEJB/AloMundoWebService"></soap:address> </wsdl:port> </wsdl:service> </wsdl:definitions> |
Foi exibido o arquivo de definição do seu web service. Confuso? Um pouco.
Esse arquivo é apenas para consulta, contém todas as informações necessárias para os usuários criarem clientes que utilizam esses serviços.
Criando um Cliente para o nosso Web service
Com o servidor publicado siga o passo a passo para construir o seu WebService Cliente
Crie um novo projeto Java Básico. Para isso digite: “Ctrl + N”. Na caixa Wizard digite “Java Project”. Selecione Next. Preencha o campo Nome como “WebServiceCliente” e agora “Finish”.
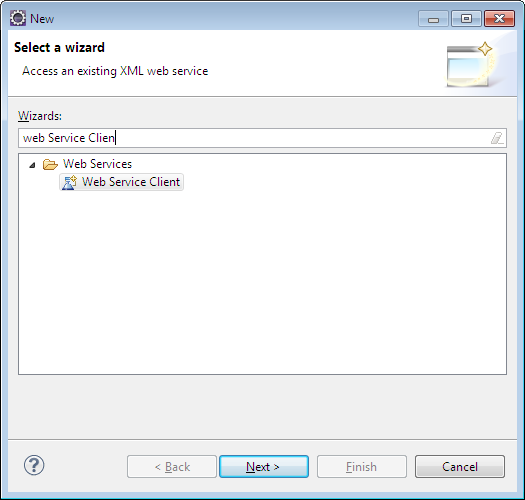
Agora selecione o projeto “WebServiceCliente” digite “Ctrl + N”. No campo “Wizard” que será exibida digite: “Web Service Client” conforme imagem abaixo.
Selecione Next.
Agora selecione o botão “browser…”
Na caixa wizard digite a URL do WSDL do seu Web Service. Que no nosso caso é: “http://localhost:8080/WebServiceEJB/AloMundoWebService?wsdl”
e selecione OK. E em seguida “finish”.
Seu projeto cliente ficará com os seguintes componentes:
 AloMundoWebService
 AloMundoWebServiceProxy
 AloMundoWebServiceService
 AloMundoWebServiceServiceLocator
 AloMundoWebServiceServiceSoapBindingStub
Nosso último passo será criar uma classe para utilizar esse cliente. Crie uma classe chamada “MeuClienteWS” :
1 2 3 4 5 6 7 8 9 10 11 12 13 14 15 16 17 18 19 20 | package br.com.feltex.webservice.util; import java.rmi.RemoteException; import br.com.feltex.webservice.AloMundoWebService; import br.com.feltex.webservice.AloMundoWebServiceProxy; public class MeuClienteWS { public static void main(String[] args) { try { AloMundoWebService webservice = new AloMundoWebServiceProxy(); String mensagemRecebida = webservice.criarMensagem("Paula"); System.out.println("Mensagem: " + mensagemRecebida); } catch (RemoteException e) { e.printStackTrace(); } } } |
O resultado deve aparecer assim:
Mensagem: Ola Paula seja bem vinda!1401107244734
Parabéns. Seu Web Service com EJB está criado.
Links relacionados
Tutorial de Web Service
Deixe um comentário
Você precisa fazer o login para publicar um comentário.