Exemplo completo com JSP JSTL Servlet JDBC PostGreSQL

Warning: WP_Syntax::substituteToken(): Argument #1 ($match) must be passed by reference, value given in /home/feltexco/public_html/felix/wp-content/plugins/wp-syntax/wp-syntax.php on line 380
Warning: WP_Syntax::substituteToken(): Argument #1 ($match) must be passed by reference, value given in /home/feltexco/public_html/felix/wp-content/plugins/wp-syntax/wp-syntax.php on line 380
Warning: WP_Syntax::substituteToken(): Argument #1 ($match) must be passed by reference, value given in /home/feltexco/public_html/felix/wp-content/plugins/wp-syntax/wp-syntax.php on line 380
Warning: WP_Syntax::substituteToken(): Argument #1 ($match) must be passed by reference, value given in /home/feltexco/public_html/felix/wp-content/plugins/wp-syntax/wp-syntax.php on line 380
Warning: WP_Syntax::substituteToken(): Argument #1 ($match) must be passed by reference, value given in /home/feltexco/public_html/felix/wp-content/plugins/wp-syntax/wp-syntax.php on line 380
Warning: WP_Syntax::substituteToken(): Argument #1 ($match) must be passed by reference, value given in /home/feltexco/public_html/felix/wp-content/plugins/wp-syntax/wp-syntax.php on line 380
Warning: WP_Syntax::substituteToken(): Argument #1 ($match) must be passed by reference, value given in /home/feltexco/public_html/felix/wp-content/plugins/wp-syntax/wp-syntax.php on line 380
Warning: WP_Syntax::substituteToken(): Argument #1 ($match) must be passed by reference, value given in /home/feltexco/public_html/felix/wp-content/plugins/wp-syntax/wp-syntax.php on line 380
Warning: WP_Syntax::substituteToken(): Argument #1 ($match) must be passed by reference, value given in /home/feltexco/public_html/felix/wp-content/plugins/wp-syntax/wp-syntax.php on line 380
Warning: WP_Syntax::substituteToken(): Argument #1 ($match) must be passed by reference, value given in /home/feltexco/public_html/felix/wp-content/plugins/wp-syntax/wp-syntax.php on line 380
Warning: WP_Syntax::substituteToken(): Argument #1 ($match) must be passed by reference, value given in /home/feltexco/public_html/felix/wp-content/plugins/wp-syntax/wp-syntax.php on line 380
Warning: WP_Syntax::substituteToken(): Argument #1 ($match) must be passed by reference, value given in /home/feltexco/public_html/felix/wp-content/plugins/wp-syntax/wp-syntax.php on line 380
Warning: WP_Syntax::substituteToken(): Argument #1 ($match) must be passed by reference, value given in /home/feltexco/public_html/felix/wp-content/plugins/wp-syntax/wp-syntax.php on line 380
Warning: WP_Syntax::substituteToken(): Argument #1 ($match) must be passed by reference, value given in /home/feltexco/public_html/felix/wp-content/plugins/wp-syntax/wp-syntax.php on line 380
Olá Amigos,
Hoje criaremos um projeto completo com as tecnologias java: JSP + JSTL + Servlet + JDBC + PostgreSQL.
Claro que iniciaremos com uma breve descrição de cada uma delas.
Tecnologias utilizadas no exemplo
1. Introdução
Este exemplo começa uma página inicial index.jsp que exibe as informações de funcionamento do projeto. Ao clicar na imagem principal é exibido o menu.jsp.
Esta página tem a opção de listagem de alunos ou realizar a manutenção (Inclusão, alteração, consulta ou exclusão de um Aluno). Se escolhermos a opção de cadastro será exibida a tela de manutenção.
Veja os campos disponíveis.

img 1 – Visão macro do nosso projeto
Para maior facilidade as classes e páginas também foram comentadas para auxiliar no entendimento e estudo do código.
    Você deverá ter conhecimento prévio de Aplicação Web Java e utilização do Tomcat.
Caso ainda não tenha, acesse os links informados no final deste artigo.
2 . Criação da tabela no banco de dados
Script de criação da tabela no Banco de dados:
1 2 3 4 5 6 7 8 | CREATE TABLE IF NOT EXISTS tbaluno( matricula bigint NOT NULL, nome character varying(255), telefone character varying(255), email character varying(255), datacadastro date, CONSTRAINT tbaluno_pkey PRIMARY KEY (matricula) ); |
É criado o comando que gera a tabela caso ela ainda não exista.
3 . Construção do projeto
Para começar vamos construir a estrutura do nosso projeto. Ao final deste tutorial o seu projeto deve estar como mostrado na imagem abaixo:
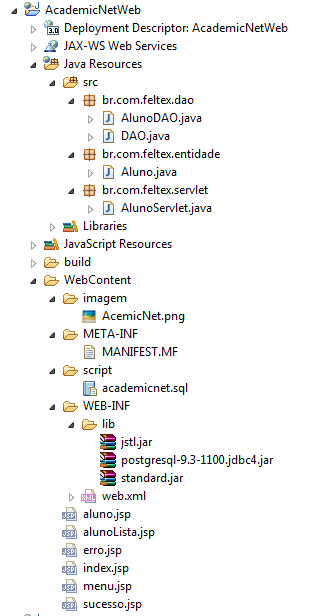
Nela temos o nome do projeto (AcademicNetWeb)
Abaixo os nós mais importantes são:
-> Java Resources (src) (Aqui teremos os códigos fontes arquivos .java)
-> WebContent (Aqui ficam os arquivos web JSPs, imagens, JavaScript).
Para criar o projeto, no Eclipse, acesse o menu File >> Other…>> Na tela que aparece escolha Web >> Dynamic Web Project.
Dê o nome de “AcademicNetWeb” … Next >> Next … Na última tela Selecione a opição “Generate web.xml deployment descriptor”. >> Finish
Para saber mais sobre criação de projeto web no Eclipse Clique Aqui
Vamos criar a classe de entidade Aluno. O conteúdo deve ser o seguinte:
1 2 3 4 5 6 7 8 9 10 11 12 13 14 15 16 17 18 19 20 21 22 23 24 25 26 27 28 29 30 31 32 33 34 35 36 37 38 39 40 41 42 43 44 45 46 47 48 49 50 51 52 53 54 55 56 57 58 59 60 61 62 63 64 65 66 67 68 69 70 71 72 73 74 75 76 77 78 79 80 81 82 83 | package br.com.feltex.entidade; import java.io.Serializable; import java.util.Date; /** * * Classe de entidade que possui os atributos do aluno * */ public class Aluno implements Serializable { private static final long serialVersionUID = -309513637403441918L; private Long matricula; private String nome; private String telefone; private String email; private Date dataCadastro; public Aluno() {} public Aluno(Long matricula) { super(); this.matricula = matricula; } public Aluno(Long matricula, String nome) { super(); this.matricula = matricula; this.nome = nome; } public Date getDataCadastro() { return dataCadastro; } public String getEmail() { return email; } public Long getMatricula() { return matricula; } public String getNome() { return nome; } public String getTelefone() { return telefone; } public void setDataCadastro(Date dataCadastro) { this.dataCadastro = dataCadastro; } public void setEmail(String email) { this.email = email; } public void setMatricula(Long matricula) { this.matricula = matricula; } public void setNome(String nome) { this.nome = nome; } public void setTelefone(String telefone) { this.telefone = telefone; } @Override public String toString() { return "Aluno [matricula=" + matricula + ", nome=" + nome + ", telefone=" + telefone + ", email=" + email + ", dataCadastro=" + dataCadastro + "]"; } } |
A Classe DAO é a classe que utilizamos para conectar como Banco de Dados PostgreSQL.
1 2 3 4 5 6 7 8 9 10 11 12 13 14 15 16 17 18 19 20 21 22 23 24 25 26 27 28 | package br.com.feltex.dao; import java.sql.Connection; import java.sql.DriverManager; /** * Classe responsável pela Conexão com o Banco de dados. É utilizada por outras * classes de persistência de dados. * */ public class DAO { public Connection getConexao() { Connection conexao = null; String usuario = "postgres"; String senha = "teco01"; String nomeBancoDados = "bdacademicnet"; try { Class.forName("org.postgresql.Driver"); conexao = DriverManager.getConnection("jdbc:postgresql://localhost:5432/" + nomeBancoDados, usuario, senha); } catch (Exception e) { e.printStackTrace(); } return conexao; } } |
A classe AlunoDAO é responsável por realizar todas as operações com Banco de dados.
Nela encontramos os métodos de persistência (
alterar – alteração de um registro no banco de dados
excluir – exclui um registro no banco de dados
existe – Verifica a existência de uma matrícula informada no banco de dados
inserir – incluirá os dados de um aluno no banco de dados
listar – retorna todos os registros existentes no banco de dados
consultar – retorna um registro identificado com a matrícula informada
)
1 2 3 4 5 6 7 8 9 10 11 12 13 14 15 16 17 18 19 20 21 22 23 24 25 26 27 28 29 30 31 32 33 34 35 36 37 38 39 40 41 42 43 44 45 46 47 48 49 50 51 52 53 54 55 56 57 58 59 60 61 62 63 64 65 66 67 68 69 70 71 72 73 74 75 76 77 78 79 80 81 82 83 84 85 86 87 88 89 90 91 92 93 94 95 96 97 98 99 100 101 102 103 104 105 106 107 108 109 110 111 112 113 114 115 116 117 118 119 120 121 122 123 124 125 126 127 128 129 130 131 132 133 134 135 136 137 138 | package br.com.feltex.dao; import java.sql.Connection; import java.sql.PreparedStatement; import java.sql.ResultSet; import java.sql.Statement; import java.util.ArrayList; import java.util.List; import br.com.feltex.entidade.Aluno; /** * * Classe de Persistência de dados dos objetos de Aluno * é "filha" da Classe DAO. * */ public class AlunoDAO extends DAO { public void alterar(Aluno aluno) { try { Connection conexao = getConexao(); PreparedStatement pstmt = conexao .prepareStatement("Update tbaluno SET nome = ?, telefone = ?, email = ?, datacadastro = ?" + " WHERE matricula = ? "); pstmt.setString(1, aluno.getNome()); pstmt.setString(2, aluno.getTelefone()); pstmt.setString(3, aluno.getEmail()); pstmt.setDate(4, new java.sql.Date(aluno.getDataCadastro().getTime())); pstmt.setLong(5, aluno.getMatricula()); pstmt.execute(); pstmt.close(); conexao.close(); } catch (Exception e) { e.printStackTrace(); } } public void excluir(Aluno aluno) { try { Connection conexao = getConexao(); PreparedStatement pstm = conexao .prepareStatement("Delete from tbaluno where matricula = ? "); pstm.setLong(1, aluno.getMatricula()); pstm.execute(); pstm.close(); conexao.close(); } catch (Exception e) { e.printStackTrace(); } } public boolean existe(Aluno aluno) { boolean achou = false; try { Connection conexao = getConexao(); PreparedStatement pstm = conexao .prepareStatement("Select * from tbaluno where matricula = ?"); pstm.setLong(1, aluno.getMatricula()); ResultSet rs = pstm.executeQuery(); if (rs.next()) { achou = true; } pstm.close(); conexao.close(); } catch (Exception e) { e.printStackTrace(); } return achou; } public void inserir(Aluno aluno) { try { Connection conexao = getConexao(); PreparedStatement pstm = conexao .prepareStatement("Insert into tbaluno (matricula, nome, telefone, email, datacadastro) values (?,?,?,?,?)"); pstm.setLong(1, aluno.getMatricula()); pstm.setString(2, aluno.getNome()); pstm.setString(3, aluno.getTelefone()); pstm.setString(4, aluno.getEmail()); pstm.setDate(5, new java.sql.Date(aluno.getDataCadastro() .getTime())); pstm.execute(); pstm.close(); conexao.close(); } catch (Exception e) { e.printStackTrace(); } } public List<Aluno> listar() { List<Aluno> lista = new ArrayList<>(); try { Connection conexao = getConexao(); Statement stm = conexao.createStatement(); ResultSet rs = stm.executeQuery("Select * from tbaluno"); while (rs.next()) { Aluno aluno = new Aluno(); aluno.setMatricula(rs.getLong("matricula")); aluno.setNome(rs.getString("nome")); aluno.setTelefone(rs.getString("telefone")); aluno.setEmail(rs.getString("email")); aluno.setDataCadastro(new java.util.Date(rs.getDate("datacadastro").getTime())); lista.add(aluno); } stm.close(); conexao.close(); } catch (Exception e) { e.printStackTrace(); } return lista; } public Aluno consultar(Aluno aluno) { try { Connection conexao = getConexao(); PreparedStatement pstm = conexao .prepareStatement("Select * from tbaluno where matricula = ?"); pstm.setLong(1, aluno.getMatricula()); ResultSet rs = pstm.executeQuery(); if (rs.next()) { aluno.setMatricula(rs.getLong("matricula")); aluno.setNome(rs.getString("nome")); aluno.setTelefone(rs.getString("telefone")); aluno.setEmail(rs.getString("email")); aluno.setDataCadastro(new java.util.Date(rs.getDate("datacadastro").getTime())); } pstm.close(); conexao.close(); } catch (Exception e) { e.printStackTrace(); } return aluno; } } |
AlunoServlet a principal classe do nosso projeto. Ela é a controladora da navegação. Todas as requisições de acesso ao banco de dados, controle de navegação, leitura de dados da tela ou envio para o destino de erro ou sucesso é responsabilidade desta classe. Seguindo o padrão MVC ela é o Contoller.
1 2 3 4 5 6 7 8 9 10 11 12 13 14 15 16 17 18 19 20 21 22 23 24 25 26 27 28 29 30 31 32 33 34 35 36 37 38 39 40 41 42 43 44 45 46 47 48 49 50 51 52 53 54 55 56 57 58 59 60 61 62 63 64 65 66 67 68 69 70 71 72 73 74 75 76 77 78 79 80 81 82 83 84 85 86 87 88 89 90 91 92 93 94 95 96 97 98 99 100 101 102 103 | package br.com.feltex.servlet; import java.io.IOException; import java.text.DateFormat; import java.text.SimpleDateFormat; import java.util.ArrayList; import java.util.Date; import java.util.List; import javax.servlet.RequestDispatcher; import javax.servlet.ServletException; import javax.servlet.annotation.WebServlet; import javax.servlet.http.HttpServlet; import javax.servlet.http.HttpServletRequest; import javax.servlet.http.HttpServletResponse; import br.com.feltex.dao.AlunoDAO; import br.com.feltex.entidade.Aluno; @WebServlet("/AlunoServlet") public class AlunoServlet extends HttpServlet { private static final long serialVersionUID = 1L; protected void doGet(HttpServletRequest request, HttpServletResponse response) throws ServletException, IOException { doPost(request, response); } protected void doPost(HttpServletRequest request, HttpServletResponse response) throws ServletException, IOException { String acao = request.getParameter("acao"); String destino = "sucesso.jsp"; String mensagem = ""; List<Aluno> lista = new ArrayList<>(); Aluno aluno = new Aluno(); AlunoDAO dao = new AlunoDAO(); try { //Se a ação for DIFERENTE de Listar são lidos os dados da tela if (!acao.equalsIgnoreCase("Listar")) { aluno.setMatricula(Long.parseLong(request.getParameter("matricula"))); aluno.setNome(request.getParameter("nome")); aluno.setTelefone(request.getParameter("telefone")); aluno.setEmail(request.getParameter("email")); //Faz a leitura da data de cadastro. Caso ocorra um erro de formatação // o sistema utilizará a data atual try { DateFormat df = new SimpleDateFormat("dd/MM/yyyy"); aluno.setDataCadastro(df.parse(request.getParameter("dataCadastro"))); } catch (Exception e) { aluno.setDataCadastro(new Date()); } } if (acao.equalsIgnoreCase("Incluir")) { // Verifica se a matrícula informada já existe no Banco de Dados // Se existir enviar uma mensagem senão faz a inclusão if (dao.existe(aluno)) { mensagem = "Matrícula informada já existe!"; } else { dao.inserir(aluno); } } else if (acao.equalsIgnoreCase("Alterar")) { dao.alterar(aluno); } else if (acao.equalsIgnoreCase("Excluir")) { dao.excluir(aluno); } else if (acao.equalsIgnoreCase("Consultar")) { request.setAttribute("aluno", aluno); aluno = dao.consultar(aluno); destino = "aluno.jsp"; } } catch (Exception e) { mensagem += e.getMessage(); destino = "erro.jsp"; e.printStackTrace(); } // Se a mensagem estiver vazia significa que houve sucesso! // Senão será exibida a tela de erro do sistema. if (mensagem.length() == 0) { mensagem = "Aluno Cadastrado com sucesso!"; } else { destino = "erro.jsp"; } // Lista todos os registros existente no Banco de Dados lista = dao.listar(); request.setAttribute("listaAluno", lista); request.setAttribute("mensagem", mensagem); //O sistema é direcionado para a página //sucesso.jsp Se tudo ocorreu bem //erro.jsp se houver algum problema. RequestDispatcher rd = request.getRequestDispatcher(destino); rd.forward(request, response); } } |
4. Criação das páginas
index.jsp Página inicial do nosso projeto. Utilizamos aqui conteúdo HTML5 puro. Uma página simples, sem conteúdo dinâmico e que possui os links para o menu da aplicação quando clicamos na imagem.
1 2 3 4 5 6 7 8 9 10 11 12 13 14 15 16 17 18 | <!DOCTYPE html> <html lang="pt"> <head> <title>Página Inicial</title> </head> <body> <div align="center"> <H1> Seja bem vindo ao sistema AcademicNet!</H1> <H2> Nesta versão utilizaremos as tecnologias: JSP + JSTL + Servlet + JDBC + PostGreSQL. </H2> <a href="menu.jsp"> <img src="imagem/AcemicNet.png"> </a> </div> <a href="http://www.feltex.com.br" target="_blank"> http://www.feltex.com.br</a> </body> </html> |
menu.jsp Página que conterá as opções de cadastros no nosso sistema. Também uma página simples, sem conteúdo dinâmico e que possui os links para o menu da aplicação quando clicamos nos links. O primeiro chamará a página aluno.jsp. O Segundo chamará o Servlet AlunoServlet com a opção de listar todos os usuários cadastrados no Banco de Dados.
1 2 3 4 5 6 7 8 9 10 11 12 13 | <!DOCTYPE html> <html lang="pt"> <head> <title>Página Inicial</title> </head> <body> <div align="center"> <H1>Seja bem vindo ao sistema AcademicNet!</H1> <a href="aluno.jsp">Manter Aluno</a><br> <a href="AlunoServlet?acao=Listar">Listar Alunos</a><br> </div> </body> </html> |
aluno.jsp Página que contém código dinâmico. Quando encontramos a marcação “${…}” significa que é um conteúdo que deve ser recebido pela página e que será exibido. Nos campos de texto recebemos os dados de aluno, veja o exemplo: value=”${aluno.nome}” que recebe o campo nome do aluno.
Nesta página utilizamos HTML5. Então podemos ver no campo matrícula a palavra required. Isso informa que este campo é obrigatório. Não será possível enviar os dados ao servidor sem o preenchimento dele.
Na linha abaixo definimos que o método de envio dos dados para o servidor será “post” e o destino no servidor será a nossa Classe Servlet: “AlunoServlet”
1 | <form method="post" action="AlunoServlet"> |
O Atributo “autofocus” no campo nome determina que este campo receberá o cursor assim que a página for carregada no seu browser.
O atributo “placeholder” é o valor que será exibido nos campos quando eles estiverem vazios. Isso serve para informar ao usuário um valor possível a ser utilizado.
As linhas
1 2 | <input type="submit" value="Enviar"> <input type="reset" value="Limpar"> <br /> |
Informam que temos um botão “submit” que envia os dados ao servidor e também um botão “reset” que limpa os valores exibidos nos campos do formulário.
1 2 3 4 5 6 7 8 9 10 11 12 13 14 15 16 17 18 19 20 21 22 23 24 25 26 27 28 29 30 31 32 33 34 | <!DOCTYPE html> <html lang="pt"> <head> <title>Cadastro de Aluno</title> </head> <body> <div align="center"> <form method="post" action="AlunoServlet"> <fieldset> <legend>Cadastro de Alunos</legend> <label>Matrícula: </label><input name="matricula" required value="${aluno.matricula}" placeholder="2236541" /><br /> <label>Name:</label><input name="nome" autofocus="autofocus" placeholder="Nome" value="${aluno.nome}"/><br /> <label>Telefone:</label><input type="tel" name="telefone" placeholder="9999-9999" value="${aluno.telefone}" /><br /> <label>Email:</label><input type="email" name="email" placeholder="andre@feltex.com.br" value="${aluno.email}"/><br /> <label>Data Cadastro:</label><input type="date" name="dataCadastro" value="${aluno.dataCadastro}" placeholder="10/10/2014" /><br /> <label>Ação</label> <select name="acao" required> <option selected value="Incluir">Incluir</option> <option value="Alterar">Alterar</option> <option value="Excluir">Excluir</option> <option value="Consultar">Consultar</option> </select><br /> <input type="submit" value="Enviar"> <input type="reset" value="Limpar"> <br /> </fieldset> </form> </div> </body> </html> |
alunoLista.jsp É uma página dinâmica que utilizamos vários recursos de JSTL. Nas primeiras linhas são declaradas as tags que serão utilizadas. Isso é feito com as marcações
“@ taglib” para cada linha dessa há um “prefix” que será utilizado como abreviação no uso da TagLib.
A tag a seguir
Já na linha “
1 2 3 4 5 6 7 8 9 10 11 12 13 14 15 16 17 18 19 20 21 22 23 24 25 26 27 28 29 30 31 32 33 34 35 36 37 38 | <!DOCTYPE html> <%@ taglib uri="http://java.sun.com/jsp/jstl/functions" prefix="fn"%> <%@ taglib uri="http://java.sun.com/jsp/jstl/fmt" prefix="fmt"%> <%@ taglib uri="http://java.sun.com/jsp/jstl/core" prefix="c"%> <html lang="pt"> <head> <meta http-equiv="Content-Type" content="text/html; charset=ISO-8859-1"> <title>Lista de Alunos</title> </head> <body> <div align="center"> <P>Lista de Alunos</P> <table border="1"> <tr> <td>Matricula</td> <td>Nome</td> <td>Telefone</td> <td>Data Cadastro</td> <td>Comandos</td> </tr> <c:forEach var="aluno" items="${listaAluno}"> <tr> <td>${aluno.matricula}</td> <td>${aluno.nome}</td> <td>${aluno.telefone}</td> <td><fmt:formatDate value="${aluno.dataCadastro}" type="both" pattern="dd/MM/yyyy"/> <td><a href="AlunoServlet?acao=Excluir&matricula=${aluno.matricula}">Excluir</a></td> </tr> </c:forEach> </table> <c:if test="${fn:length(listaAluno) > 0}"> Existem ${fn:length(listaAluno)} alunos! </c:if><br> </div> <a href="menu.jsp">Voltar</a> </body> </html> |
sucesso.jsp Esta página é exibida quando há uma atualização bem sucedida no banco de dados. É feito o uso de JSTL aqui.
Temos o uso do
é realizado um include dinâmico da página de lista de alunos. Isso significa que será exibida a listagem de alunos ao carregar esta página.
1 2 3 4 5 6 7 8 9 10 11 | <!DOCTYPE html> <%@ taglib uri="http://java.sun.com/jsp/jstl/core" prefix="c"%> <html lang="pt"> <head> <title>Página de Sucesso</title> </head> <body> <H1>Mensagem JSTL: <c:out value="${mensagem}" /></H1> <jsp:include page="alunoLista.jsp"/> </body> </html> |
A página erro.jsp é responsável por receber a variável “mensagem” e exibi-la. Esta página é mostrada sempre que há um problema de atualização de dados dos no Banco de dados.
1 2 3 4 5 6 7 8 9 10 11 | <!DOCTYPE html> <html lang="pt"> <head> <title>Mensagens de Erro</title> </head> <body>Verifique o erro: ${mensagem} <a href="menu.jsp">Voltar</a> </body> </html> |
Por fim temos o nosso arquivo web.xml que é bem simples para o nosso projeto. Ele apenas define qual será a página inicial da nossa aplicação. Atualmente é index.jsp. Caso você queira uma página diferente, por exemplo, a de login. basta alterar a linha “
1 2 3 4 5 6 7 8 9 | <?xml version="1.0" encoding="UTF-8"?> <web-app xmlns:xsi="http://www.w3.org/2001/XMLSchema-instance" xmlns="http://java.sun.com/xml/ns/javaee" xmlns:web="http://java.sun.com/xml/ns/javaee" xsi:schemaLocation="http://java.sun.com/xml/ns/javaee http://java.sun.com/xml/ns/javaee/web-app_3_0.xsd" id="WebApp_ID" version="3.0"> <welcome-file-list> <welcome-file>index.jsp</welcome-file> </welcome-file-list> </web-app> |
Observe que temos também, nas pasta WEB-INF\lib os arquivos:
jstl.jar e standard.jar (Contém as tags que precisamos para uso de JSTL)
postgresql-9.3-1100.jdbc4.jar (Driver para realizar a conexão como Banco de dados PostgreSQL)
Esses arquivos são necessário para que o nosso projeto funcione.
Deixei disponível o projeto completo com o código fonte para auxiliar a todos no processo de aprendizado. Para baixar: Clique aqui
Conclusão
Este é um projeto simples que explica os conceitos necessários para construção de um aplicativo completo para Java Web.
Ele pode ser utilizado em qualquer Servidor Web (JBoss, Tomcat, Websphere, Weblogic), pois não há nenhuma configuração específica para uma implementação de servidor.
Para utilizar este projeto com outros bancos de Dados (MySQL, SQL Server, Oracle, DB2) basta alterar a forma de conexão na classe “DAO”.
Links relacionados
Recomendo que leia: Como gerenciar a transação JPA com Hibernate via Filtro em projeto Web
Leia também: Exemplo completo com JSF Primefaces + EJB + Hibernate + MySQL + JMS (Topic)
Você irá gostar:Bean Transaction Management
Java Web
JDBC
Projetos Completos em Java – aprenda na prática
Exemplo completo com JSF Primefaces + EJB + Hibernate + MySQL + JMS
Exemplo completo com JSF Primefaces + EJB + Hibernate + MySQL + JMS (Topic)
Abraços e bons estudos.
Deixe um comentário
Você precisa fazer o login para publicar um comentário.